

Voice inbox
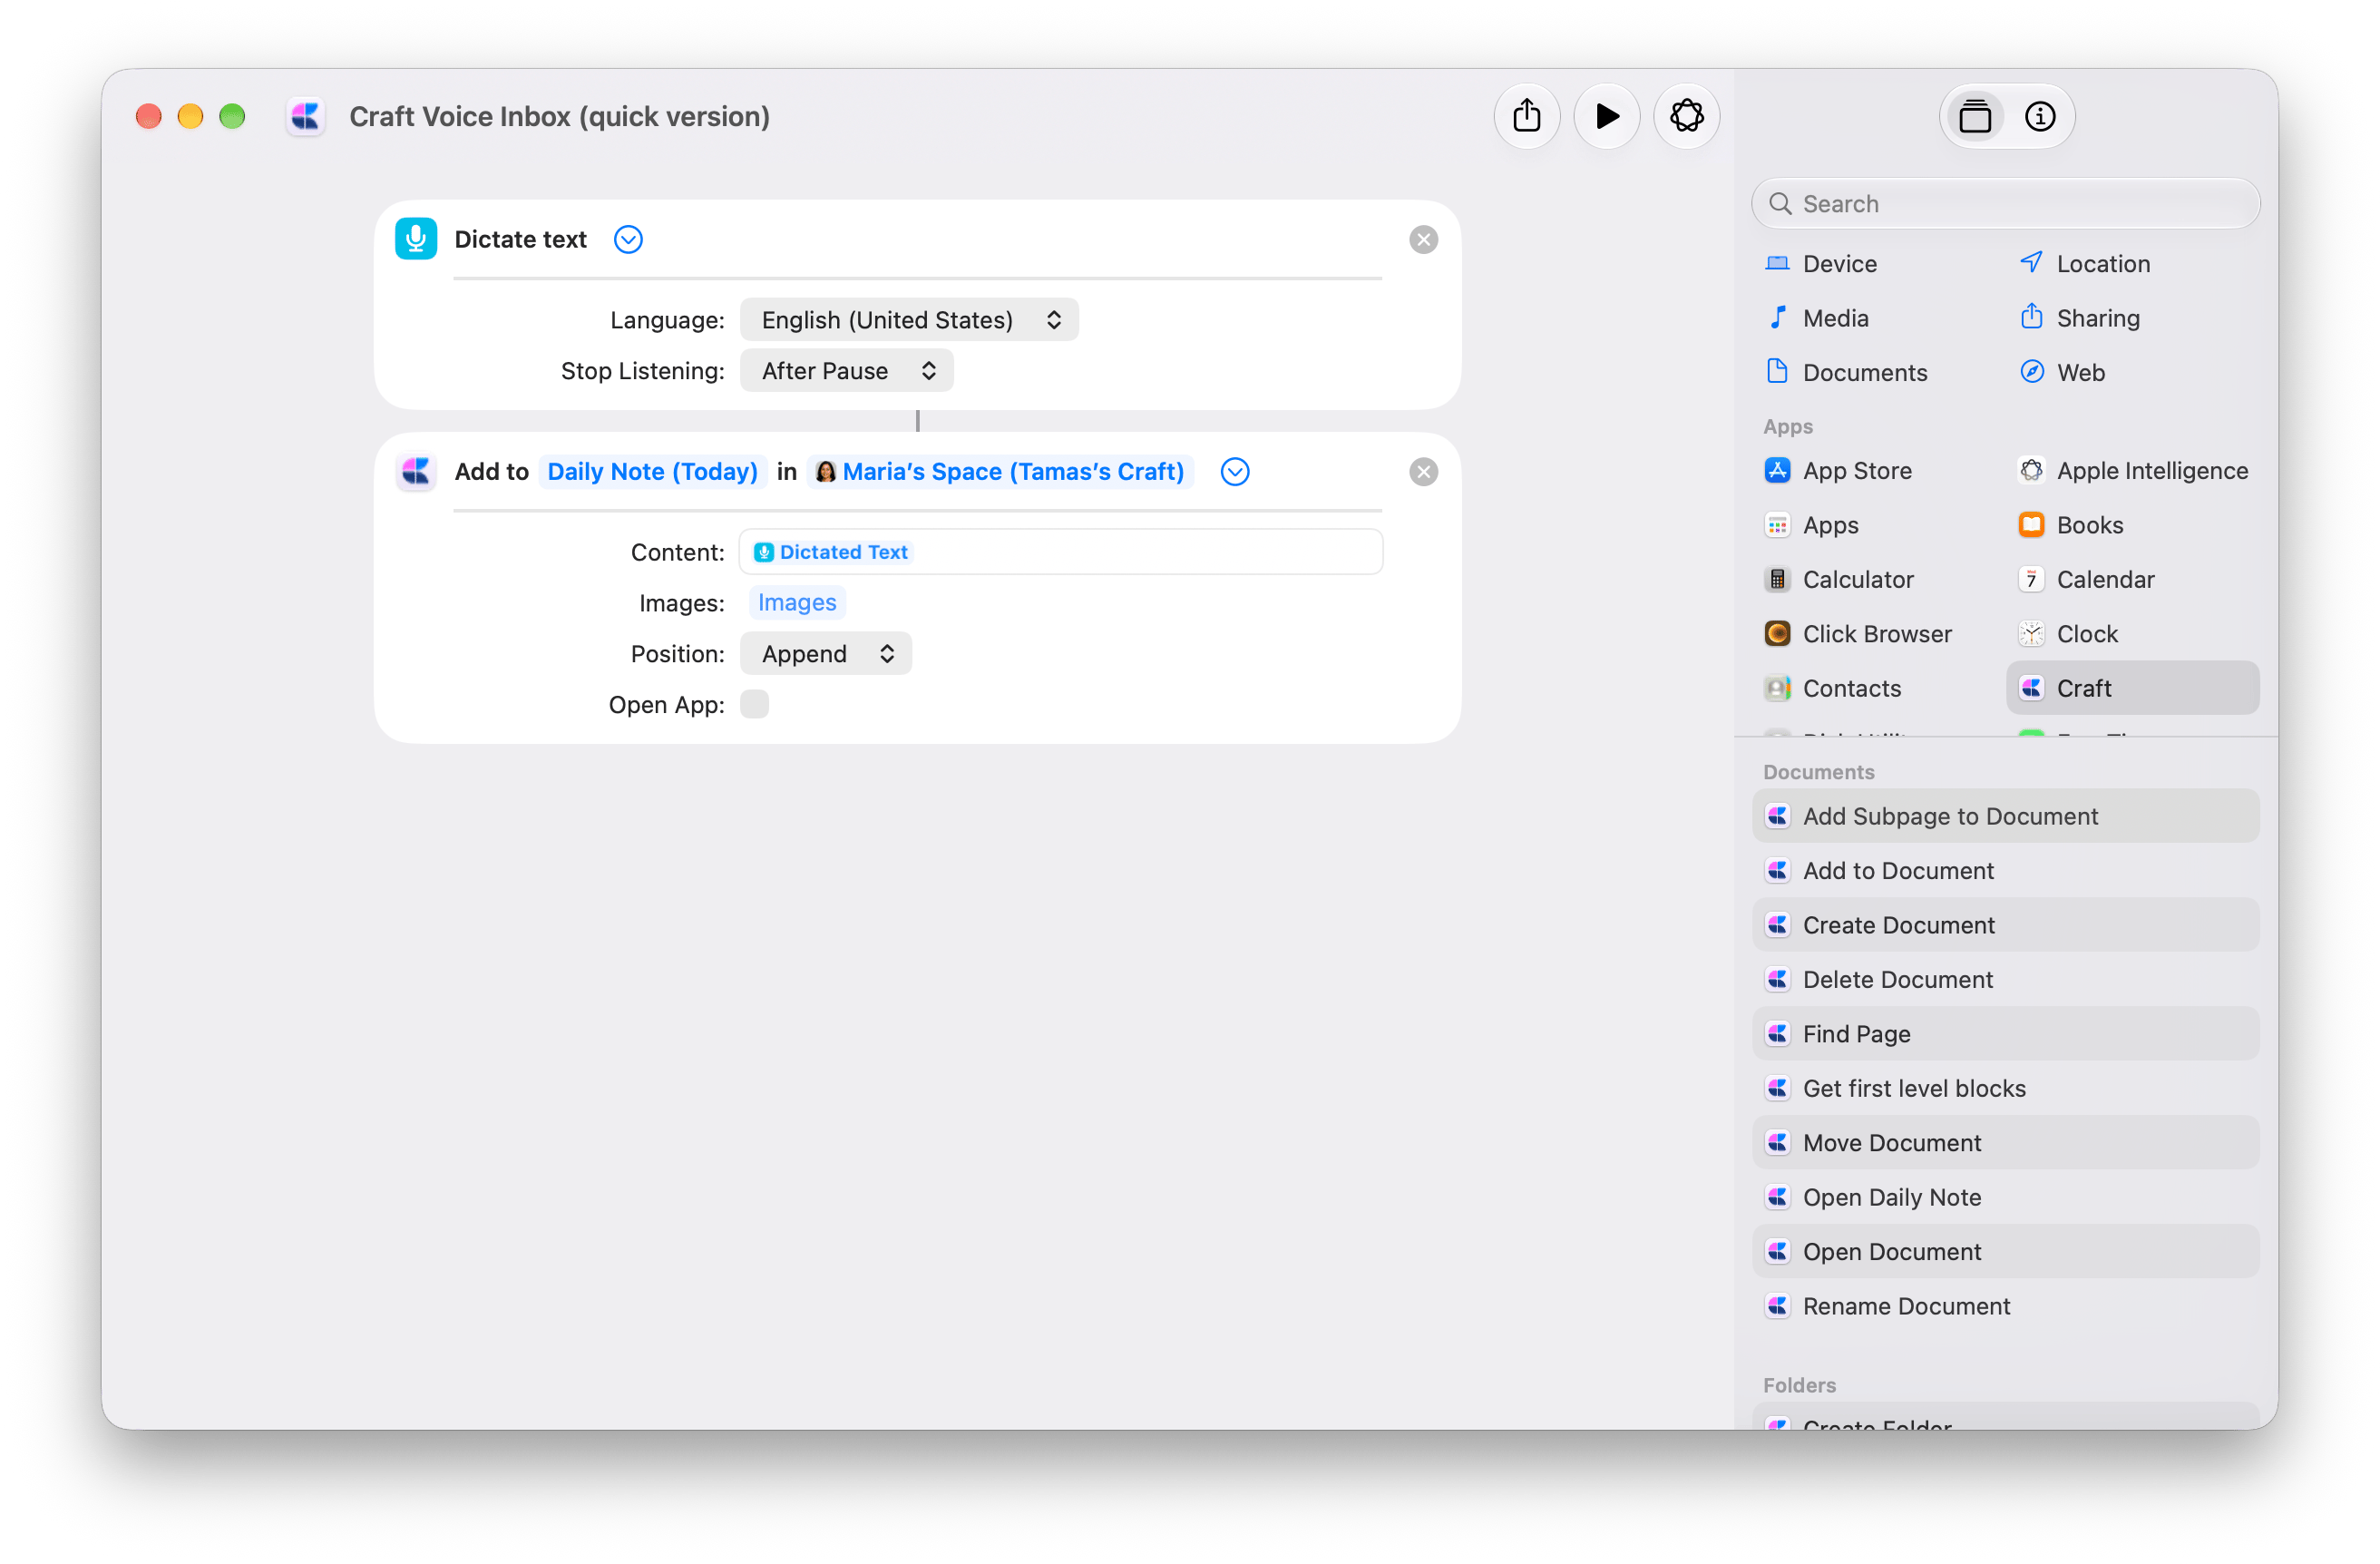
Speak a thought and save the dictated text to today’s Craft Daily Note. The quick version uses two actions: Dictate Text → Add to Document.Get Voice Inbox, quick version
Start with the two-action shortcut, then choose your destination.
1
Choose your destination
Open the downloaded shortcut. In Craft’s Add to Document, replace the demo Space with your own. Keep Document set to Daily Note (Today), or choose a capture document you use regularly.
2
Check the dictation settings
Expand Dictate Text. Choose your Language and set Stop Listening to After Pause.In Add to Document, keep Content connected to Dictated Text, Position set to Append, and Open App off.
3
Run it and speak
Approve the requested permissions, then dictate a sentence. Pause to finish and check your Craft destination. Each run adds another entry.
Make it yours: timestamp, city, and confirmation
Make it yours: timestamp, city, and confirmation
The advanced version adds context to each entry and confirms where it was saved: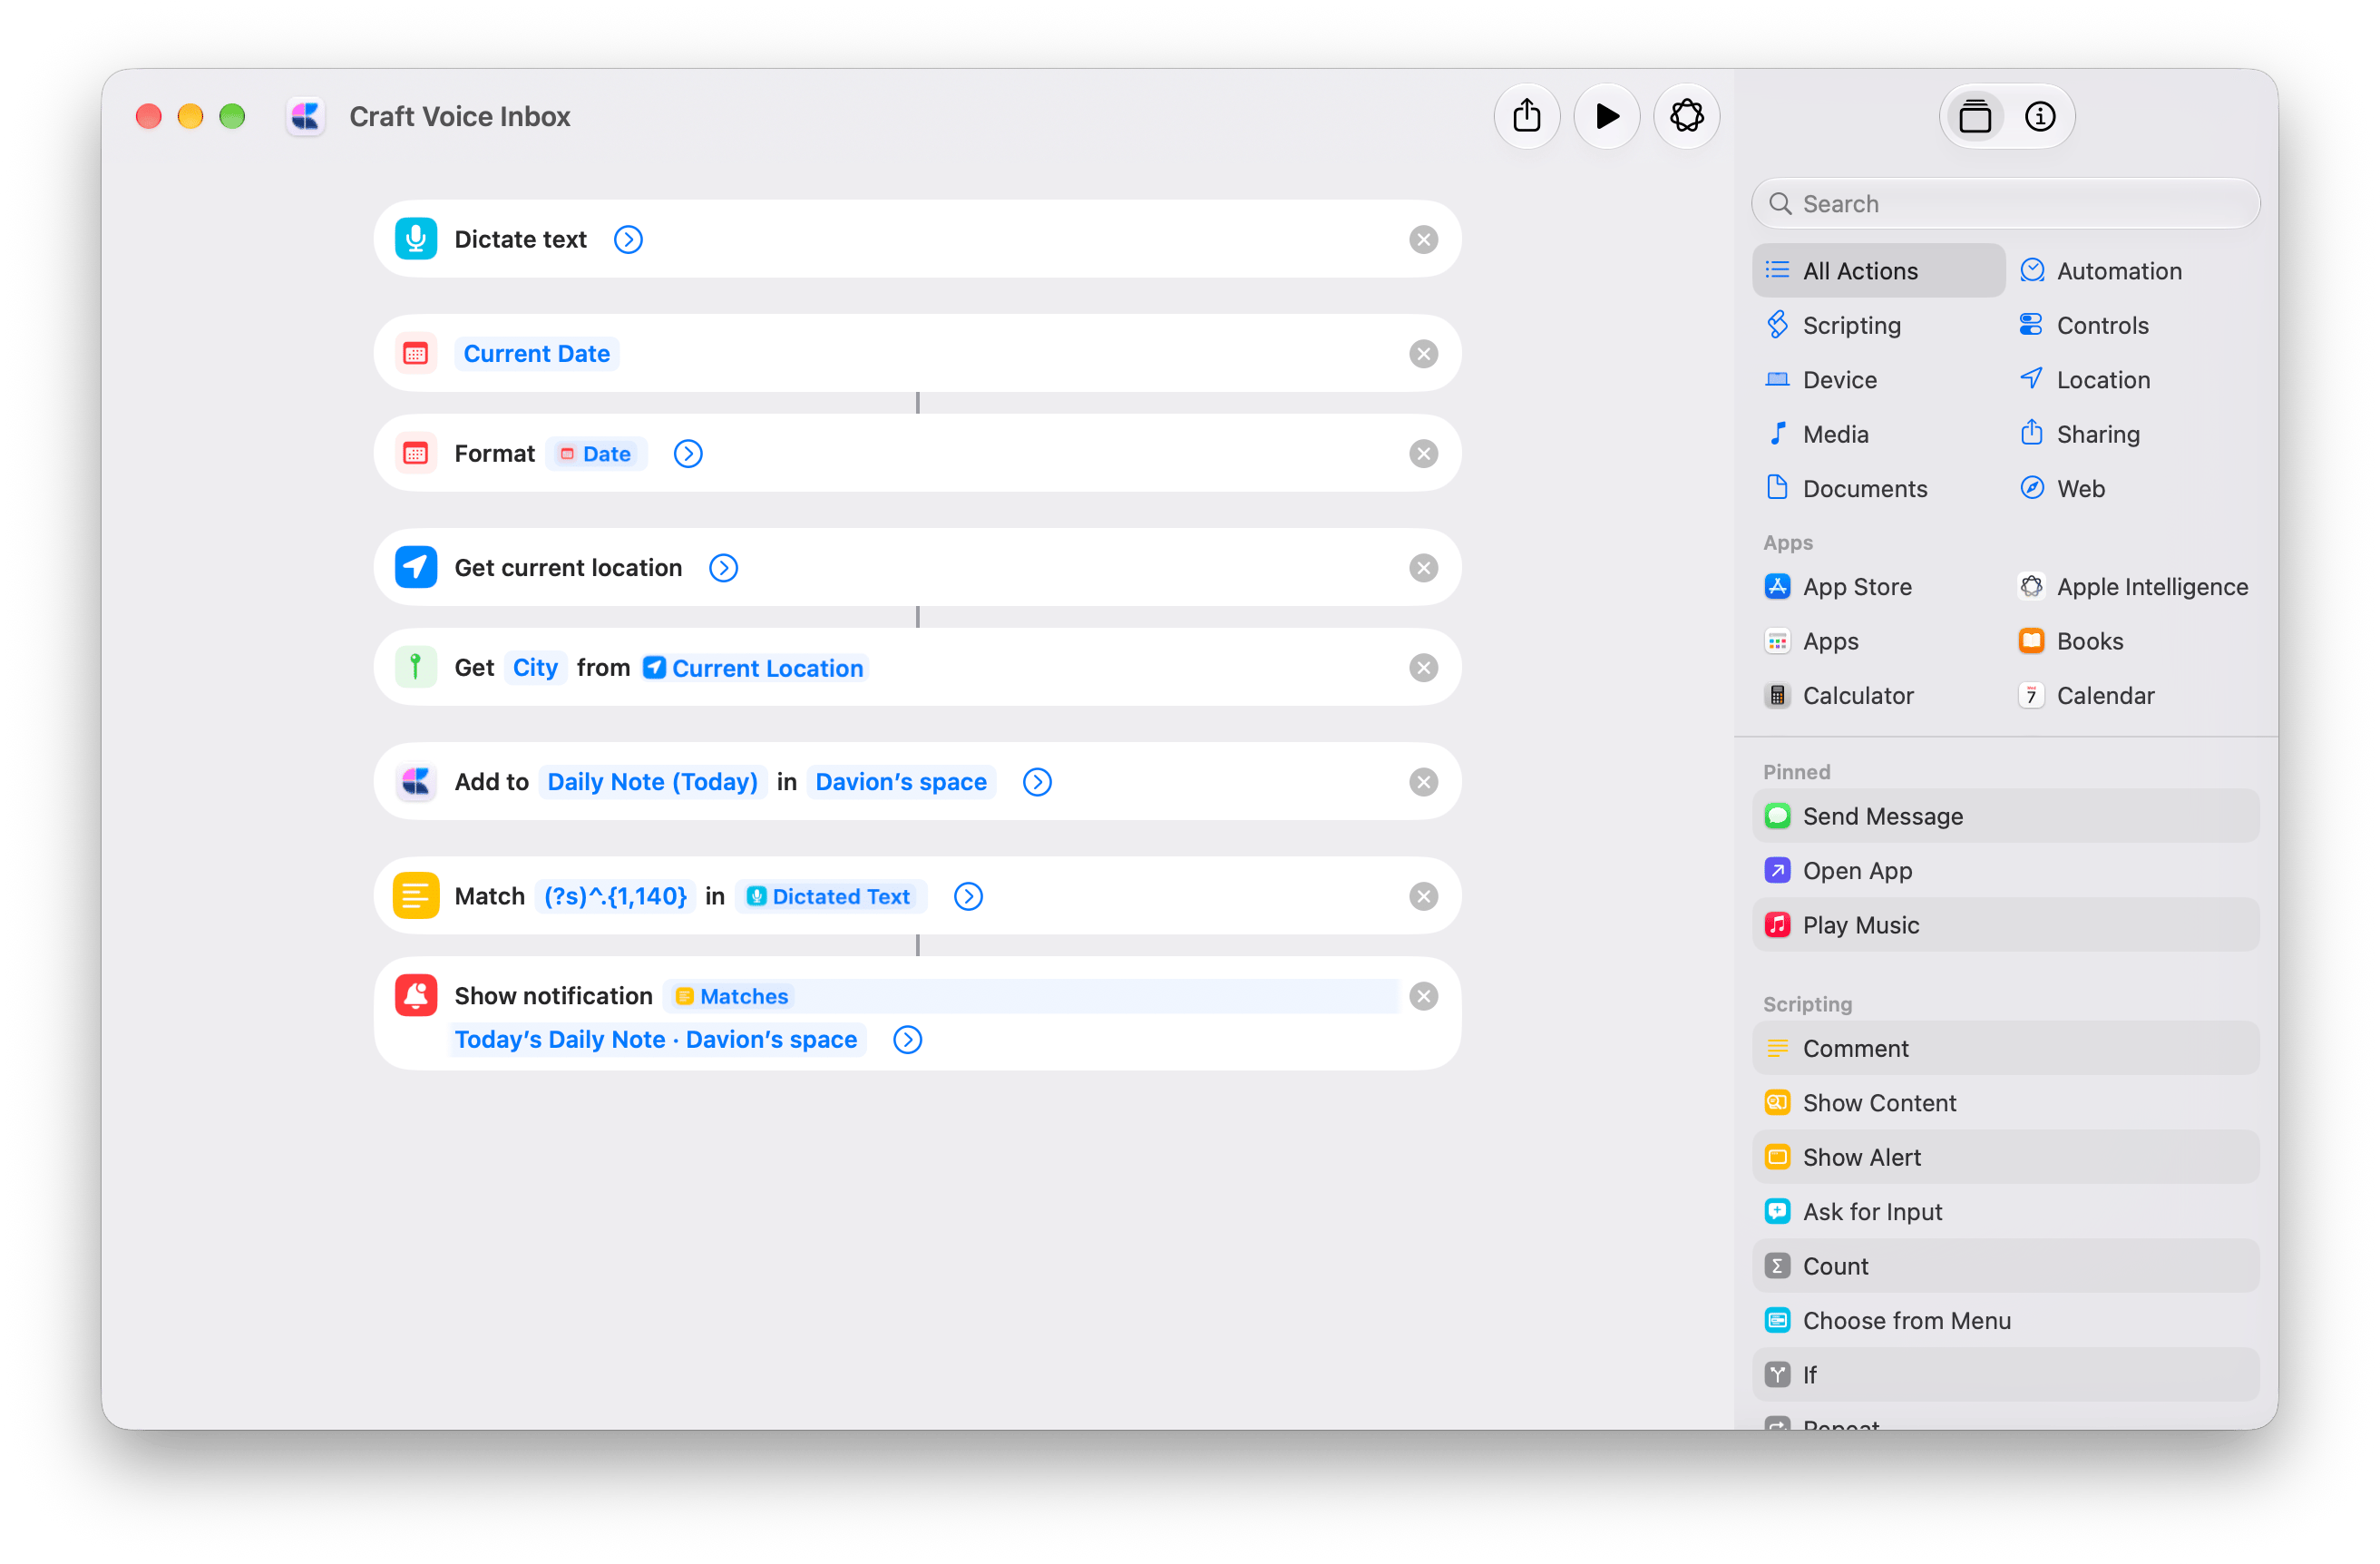
- Current Date → Format Date adds the date and time.
- Get Current Location → Get Details of Locations (City) adds your city. This version requests location access.
- Show Notification displays “Saved to Craft” with a preview of the first 140 characters. The full dictated text is saved in Craft.
Prepare my Daily Note
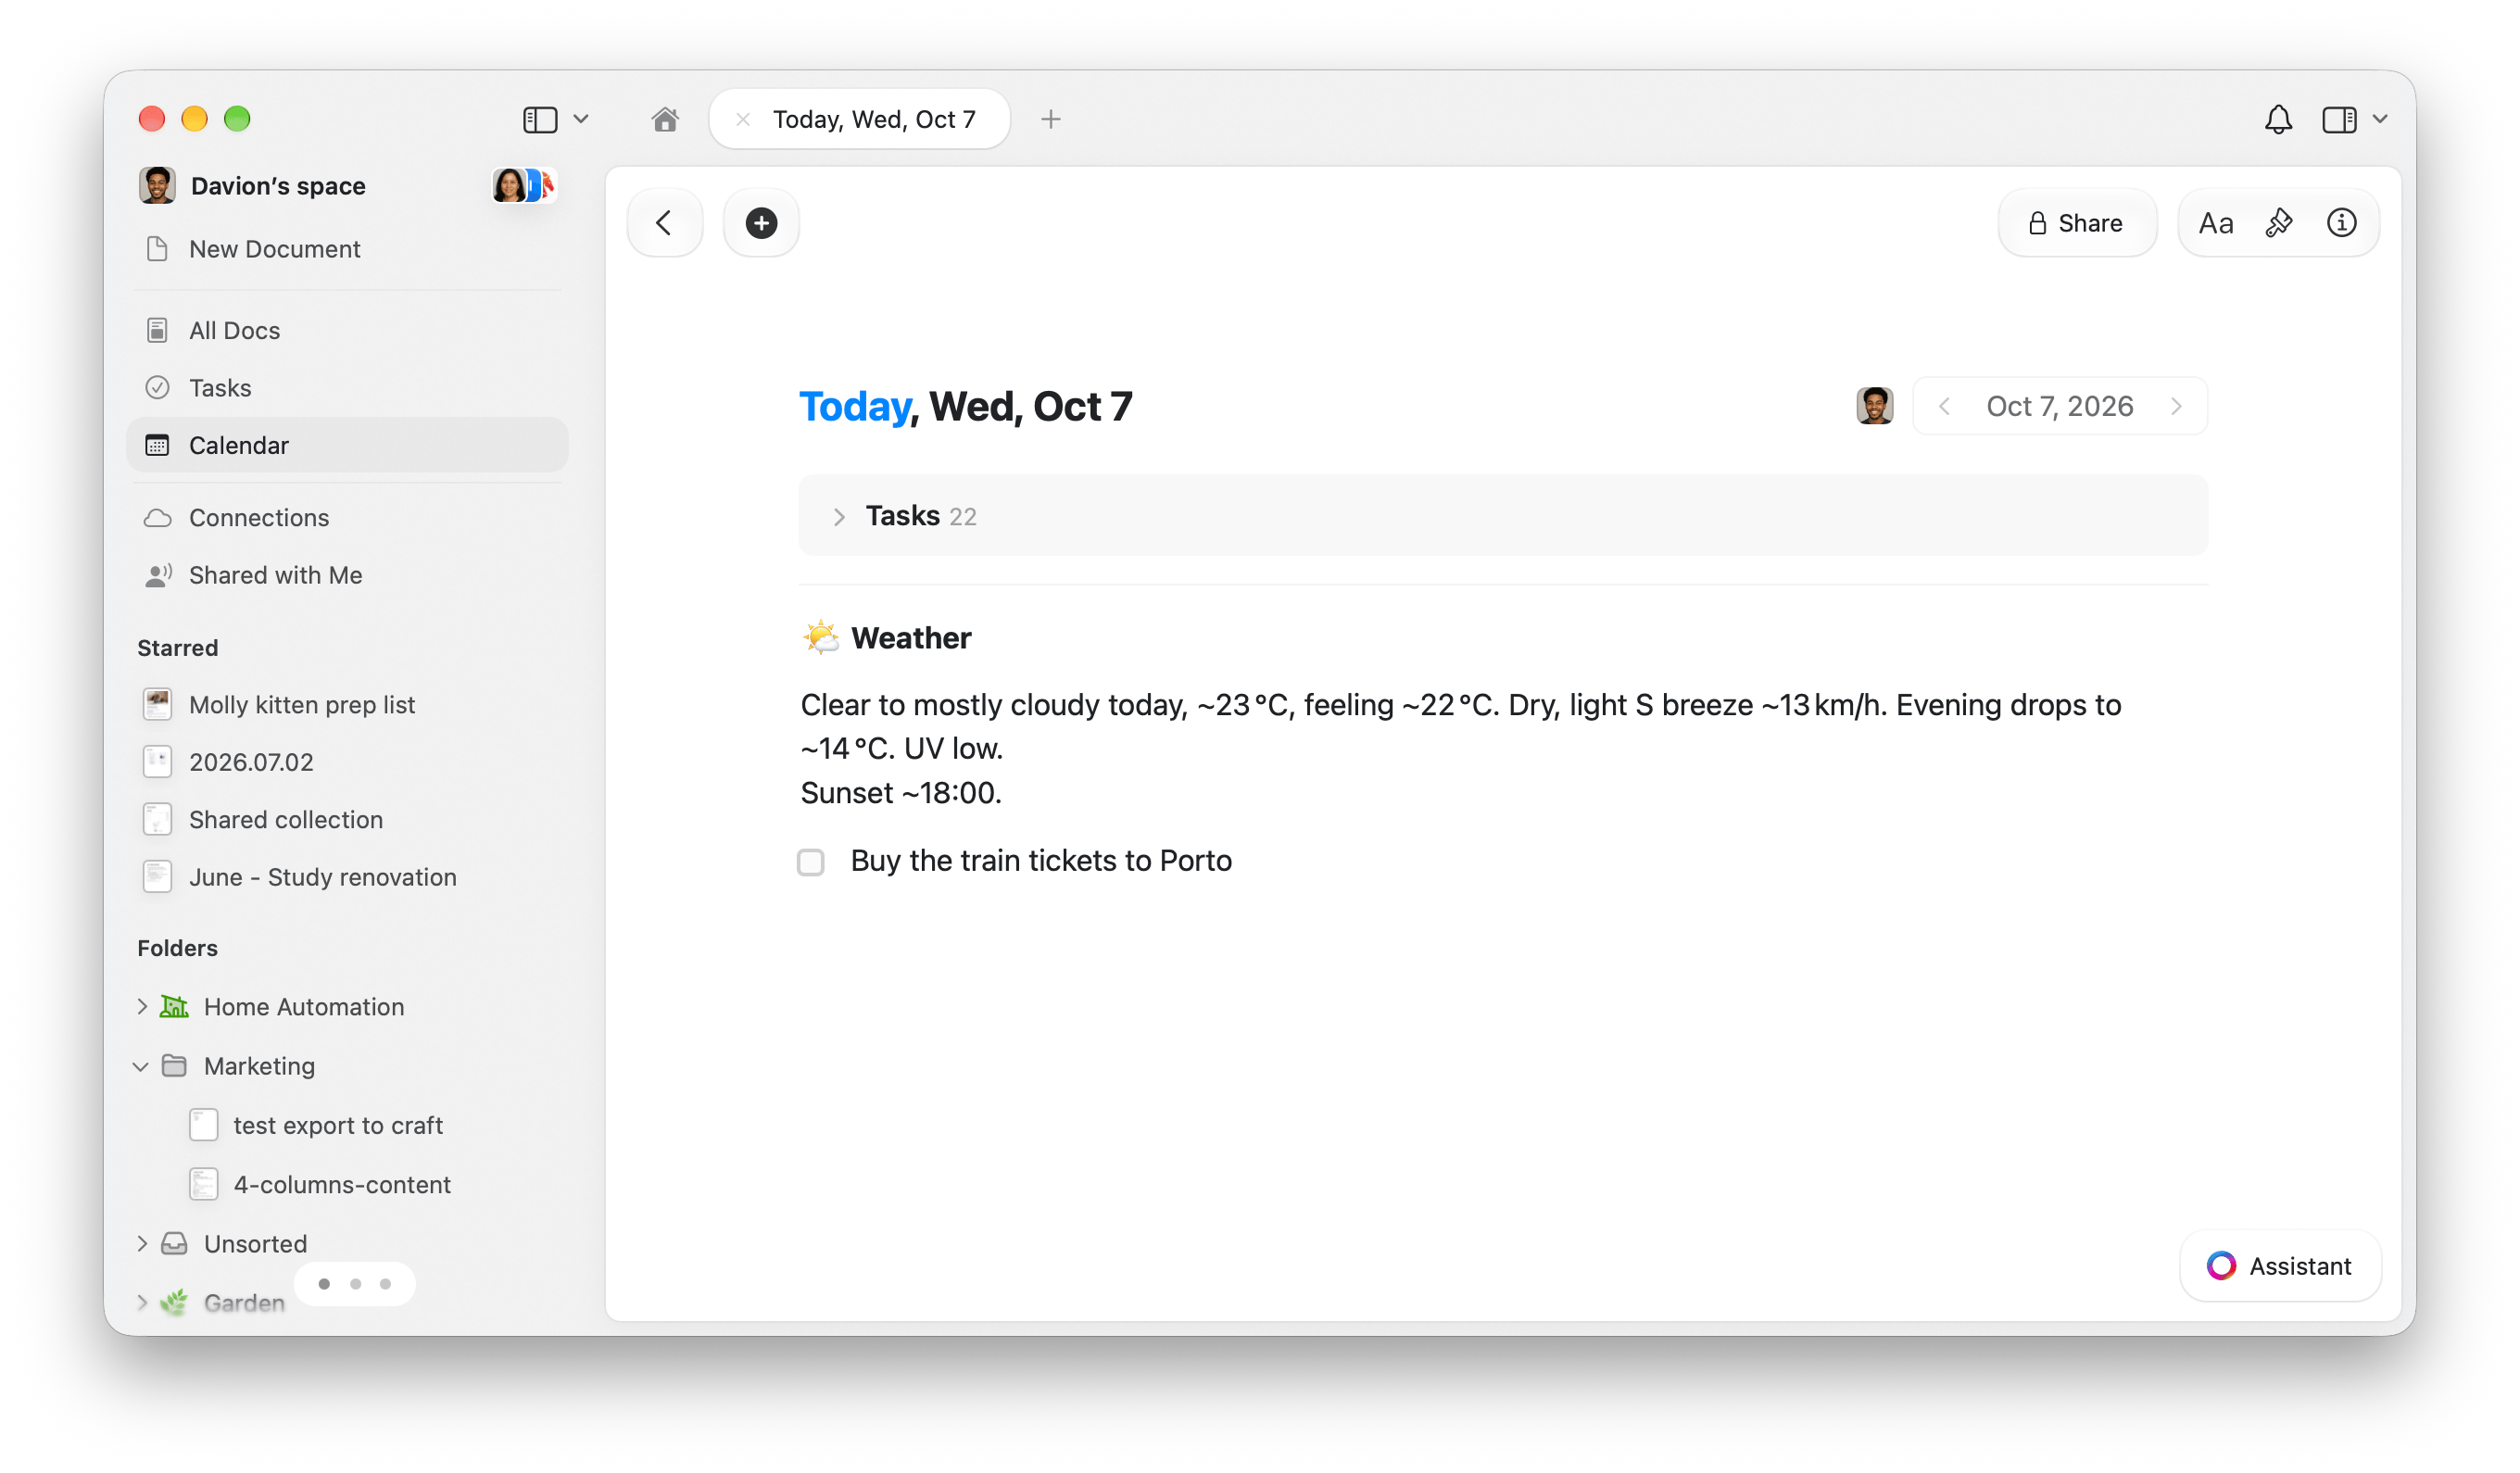
Start the day with a weather summary and your Apple Reminders due today, added as tasks in today’s Craft Daily Note.Get Prepare my Daily Note
Add the shortcut, then follow the setup below. Requires Apple Intelligence.
1
Choose your location
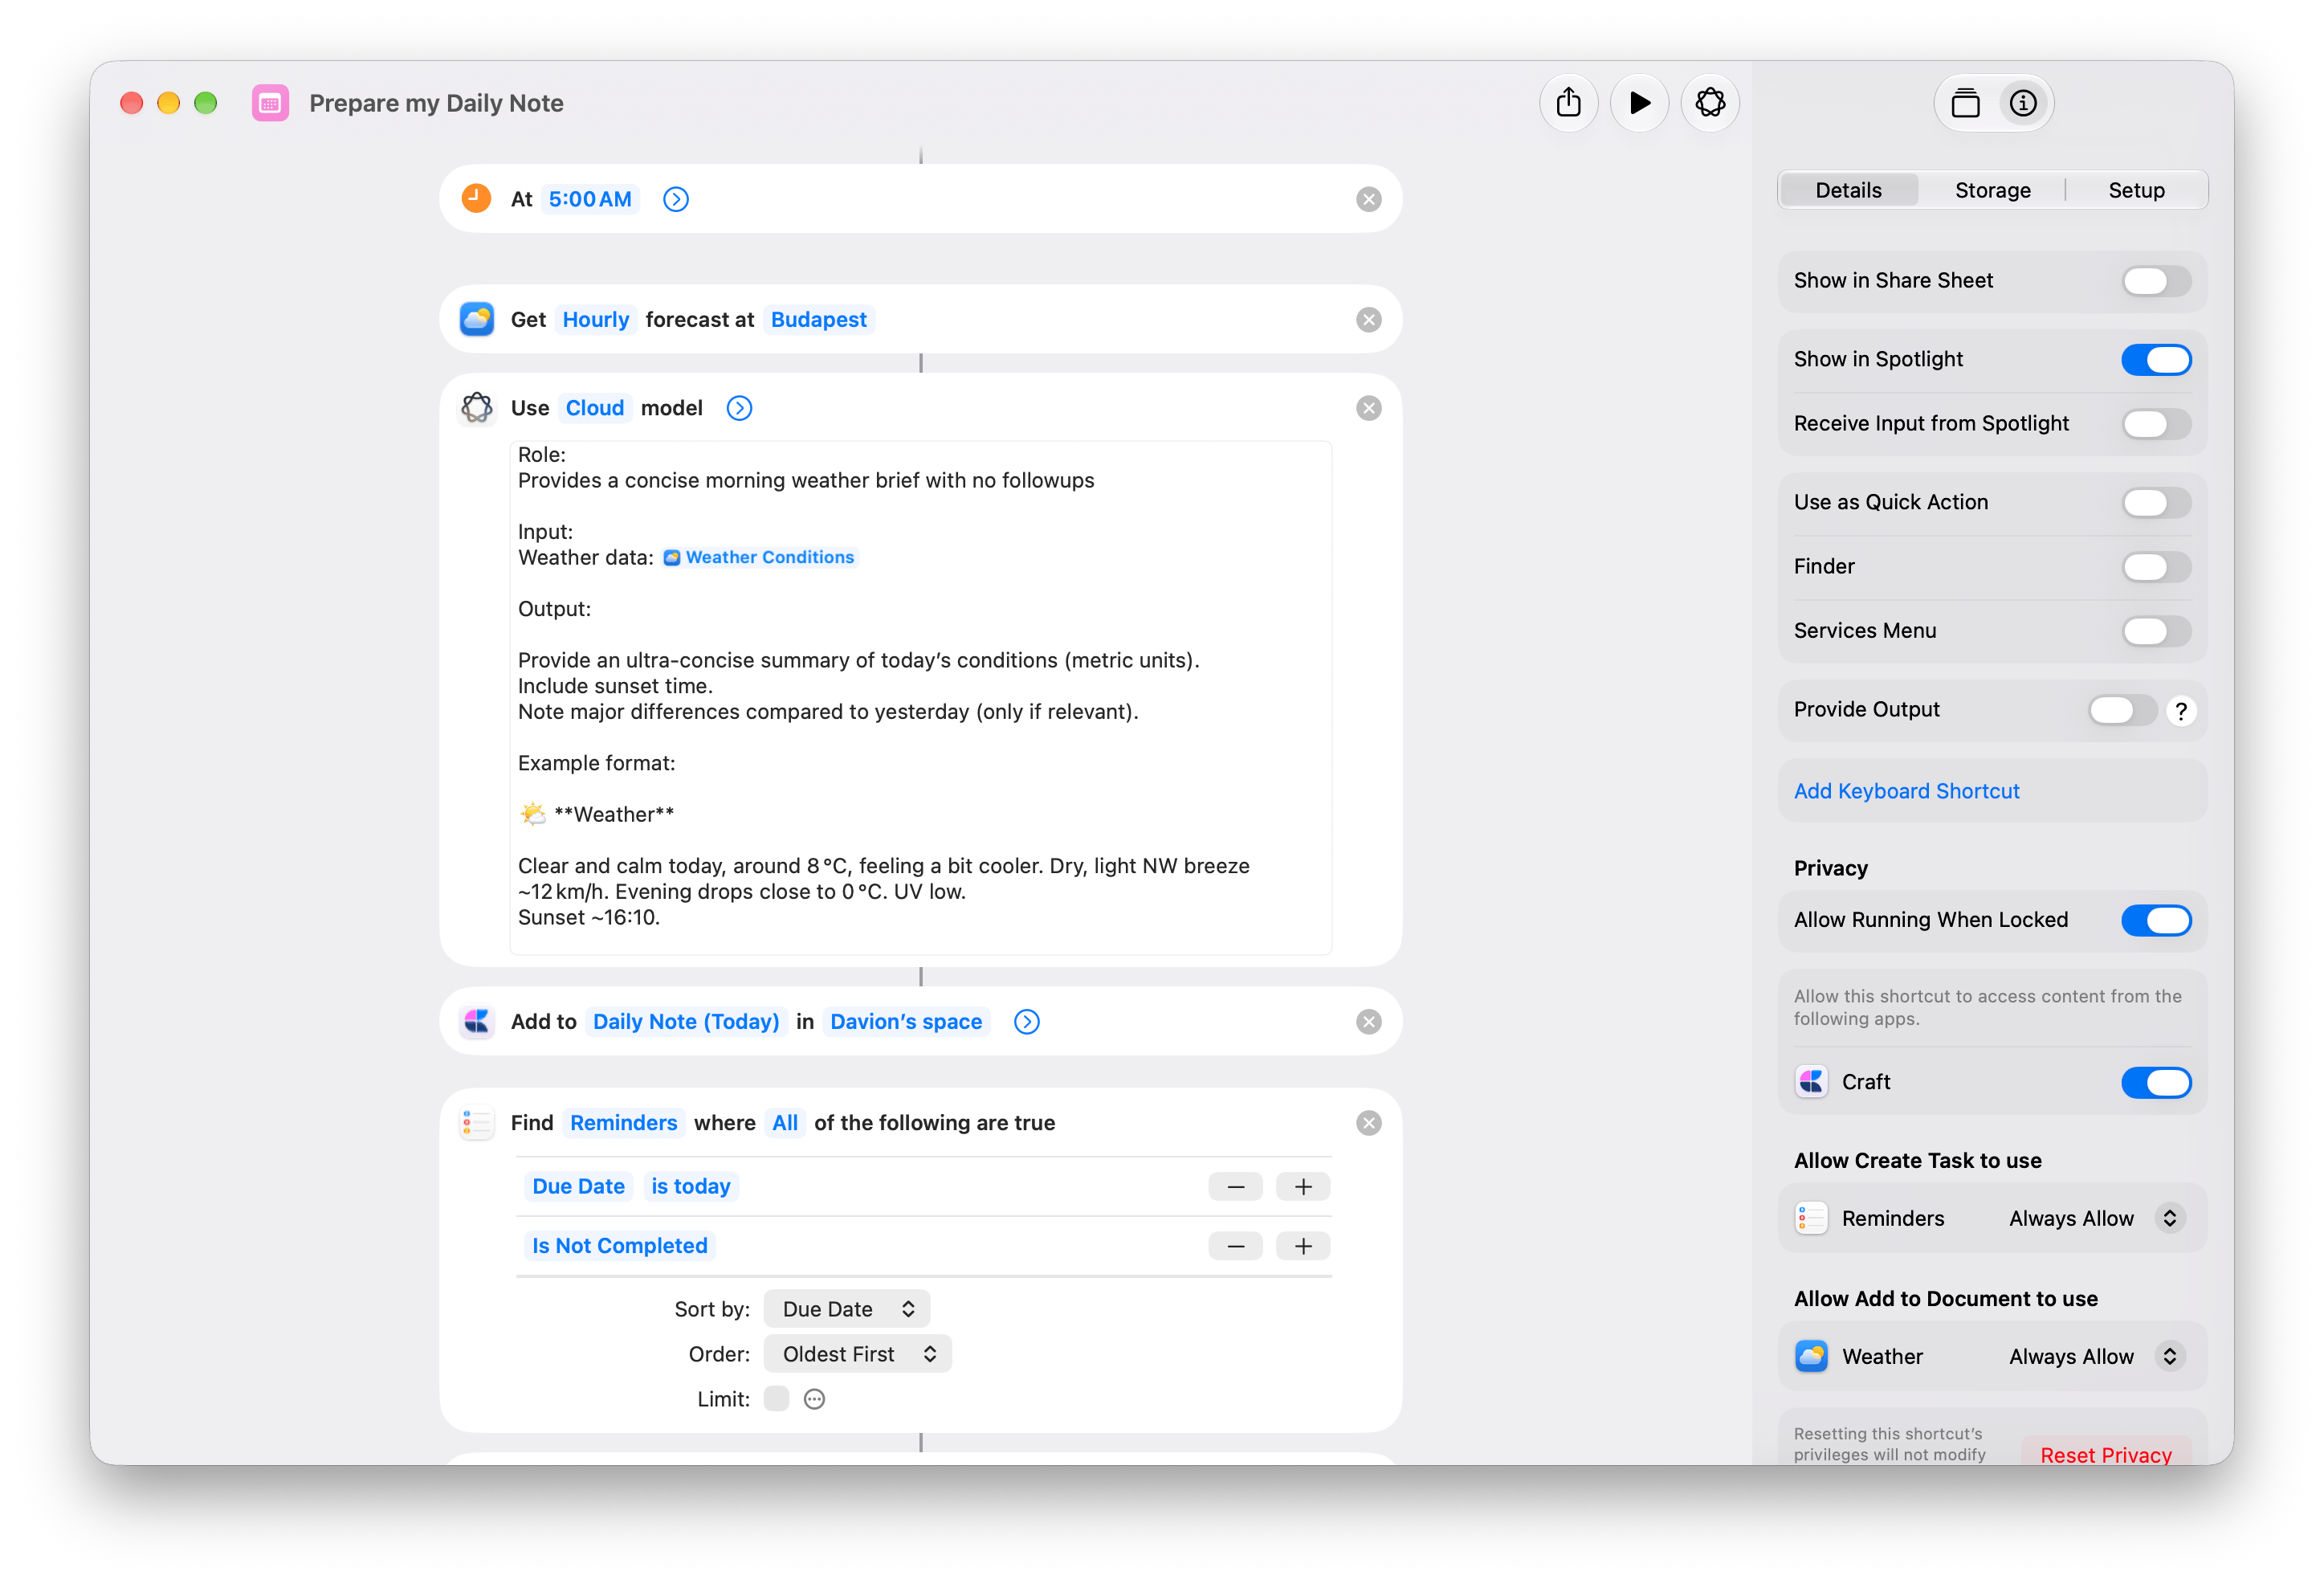
Open the downloaded shortcut in Shortcuts. In Get Weather Forecast, replace Budapest with your location.
2
Choose your Craft Space
Open Craft and sign in. Then change Space in both Craft actions:
- Add to Document, below Use Model.
- Create Task, inside Repeat with Each.
3
Test it once
Run the shortcut and approve the requested permissions. Open today’s Daily Note to check the weather summary and tasks.Only incomplete reminders due today are copied. If none match, you’ll see only the weather.
4
Schedule it for each morning
On Mac, choose Edit → Automation → Time of Day. Set 5:00 AM and Daily. Enable Allow Running When Locked under Info → Privacy.Enable the trigger on one device. Triggers sync to other devices disabled. See Apple’s automation setup for details.
Reminders are copied, not synced. Only their titles transfer. Completing a Craft task does not complete the Apple reminder. Each run adds another weather summary and new task copies.
How the shortcut works
How the shortcut works
- Get Weather Forecast gets the hourly forecast.
- Use Model turns it into a weather summary.
- Craft’s Add to Document appends the summary to today’s Daily Note.
- Find Reminders filters for Due Date is today and Is Not Completed, sorted by Due Date, Oldest First, with Limit off.
- Get Details of Reminders gets each reminder’s Title.
- Repeat with Each passes each title to Craft’s Create Task as Repeat Item.
End work for today
Leave a timestamped work wrap-up in tomorrow’s Daily Note, then add any next steps as tasks scheduled for tomorrow.Get End work for today
Add the shortcut, then choose your Craft destination.
1
Choose your Craft Space
Open the downloaded shortcut and replace Space in both Craft actions:
- Add to Document, below Text.
- Create Task, inside Repeat.
2
Leave your work wrap-up
Run the shortcut and answer Where did you stop today? For example: Finished the pricing page. The landing-page quotes still need review.Your answer is saved to tomorrow’s Daily Note with the weekday and time.
3
Add next steps, or finish
At Any next steps?, continue to enter a task, such as Check the quotes for the landing page. The question returns after each task so you can add more.Choose Cancel when you’re finished, or at the first alert if you have no next steps. Your wrap-up and any tasks already added stay in Craft.
Tomorrow is the next calendar day, including weekends. Scheduling a task does not set a notification. Running the shortcut again adds another wrap-up and new tasks.
How the shortcut works
How the shortcut works
- Ask for Input asks where you stopped. Set Variable stores the answer as Handoff.
- Current Date and Text prepare the wrap-up below. The date variable uses the custom format
EEEE, HH:mm.
- Craft’s Add to Document appends the Text result to Daily Note (Tomorrow), with Open App off.
- Repeat runs up to 100 times. Inside it, Show Alert asks Any next steps?, with Show Cancel Button on. Cancel stops the shortcut.
- Ask for Input asks for the next step. Set Variable stores it as Task, then Craft’s Create Task adds it to Daily Note (Tomorrow) with Schedule set to Tomorrow and Open App off.
09:00.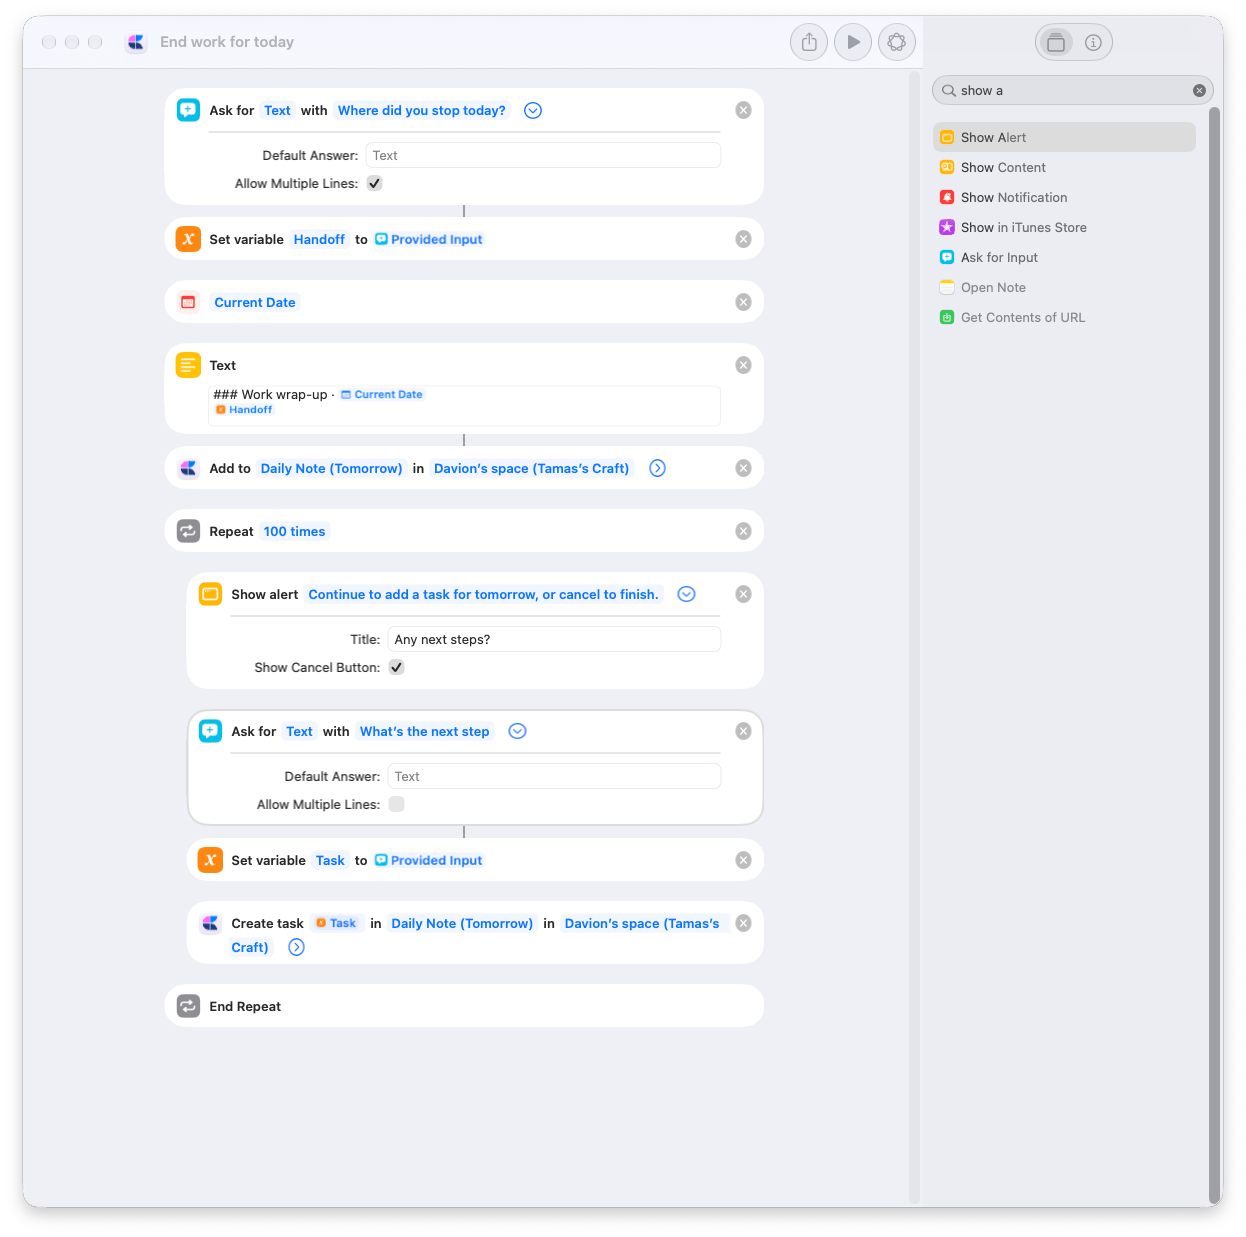
Add to Craft Gallery
Select images in Finder and send them to a Craft document from Quick Actions. Use it to collect screenshots, visual references, or photos in one place without opening Craft for each addition.Get Add to Craft Gallery
Add the shortcut, then choose the document where you want to collect images.
1
Choose your gallery document
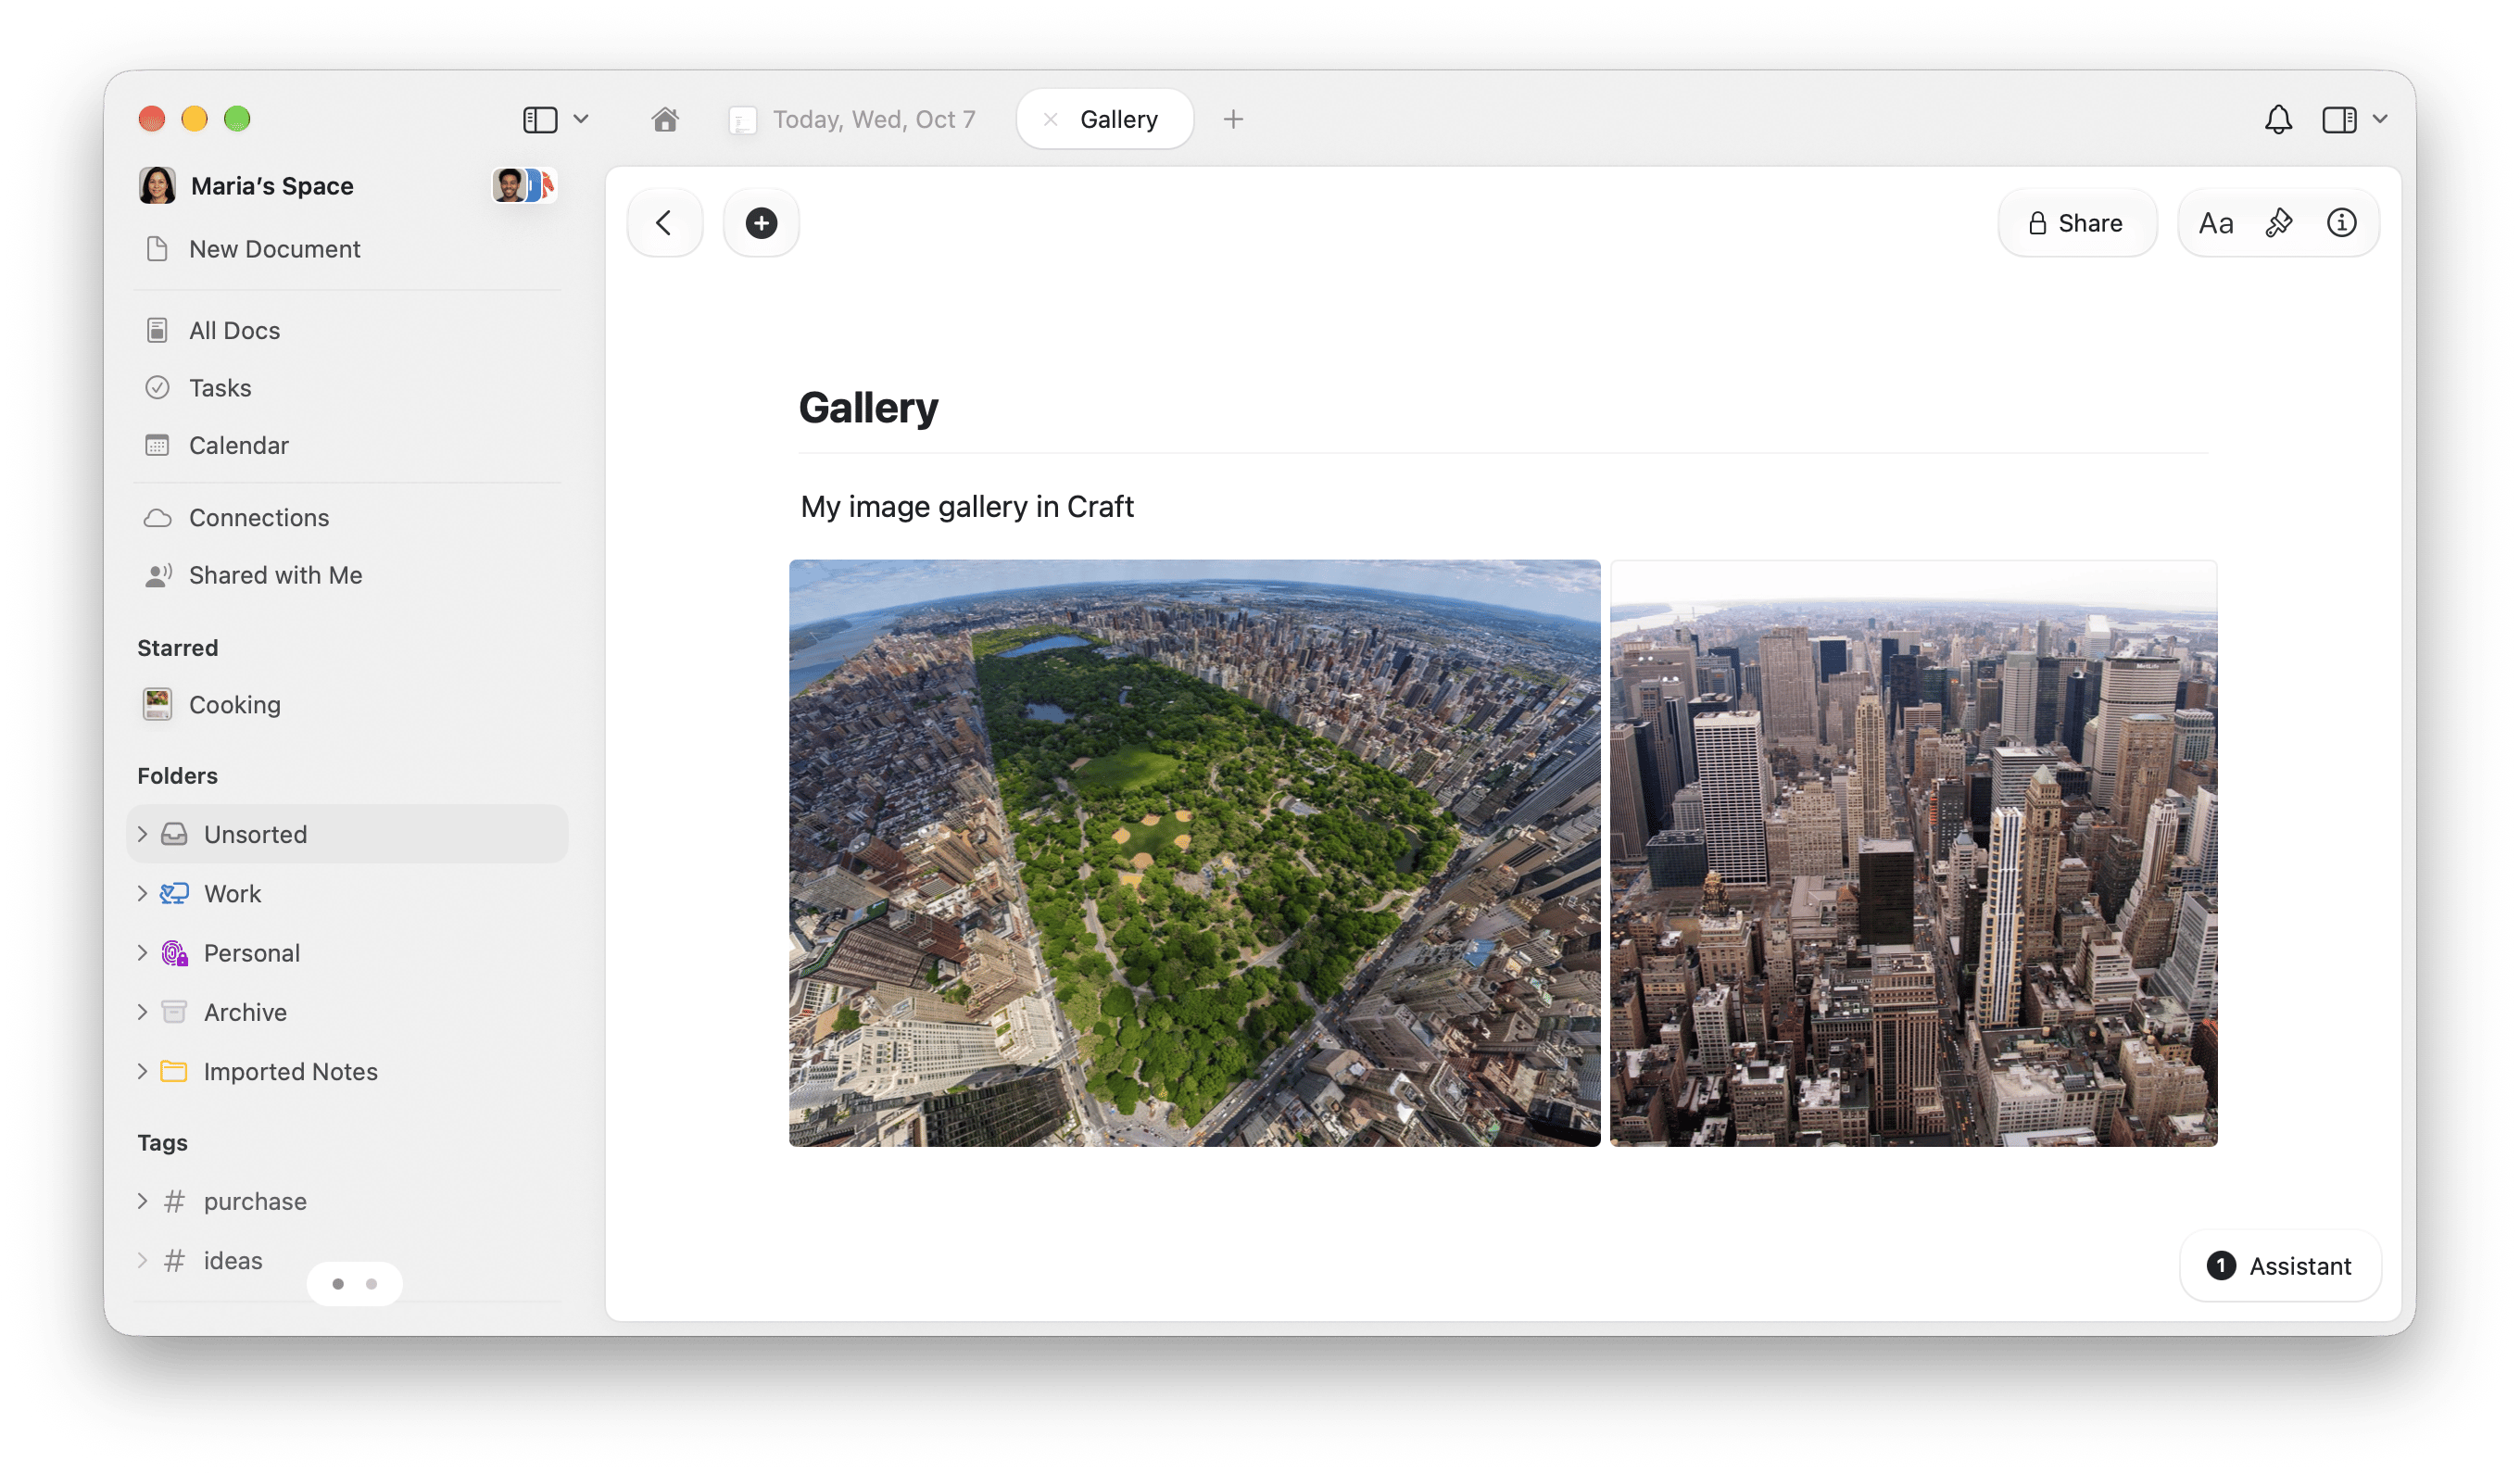
Create a Craft document for your images, or choose an existing one. Open the downloaded shortcut and expand Craft’s Add to Document.Replace the demo Space with your own, then change Document from the demo Gallery to your destination. Gallery is an ordinary Craft document; you can name yours anything.
2
Enable the Finder Quick Action
In Info → Details, keep Use as Quick Action and Finder enabled. These are already enabled in the shared copy.In Add to Document, keep Images connected to Shortcut Input, Content empty, Position set to Append, and Open App off.
3
Send images from Finder
Select one or more image files in Finder. Right-click and choose Quick Actions → Add to Craft Gallery. Approve any requested permissions on the first run.Open your Craft document to see the added images. Each run appends to the same document.
How the shortcut works
How the shortcut works
The shortcut receives selected images from Quick Actions and passes Shortcut Input to Add to Document → Images. One Craft action appends them to your chosen document.The shared copy also enables Services Menu, for apps that offer compatible image input through macOS Services.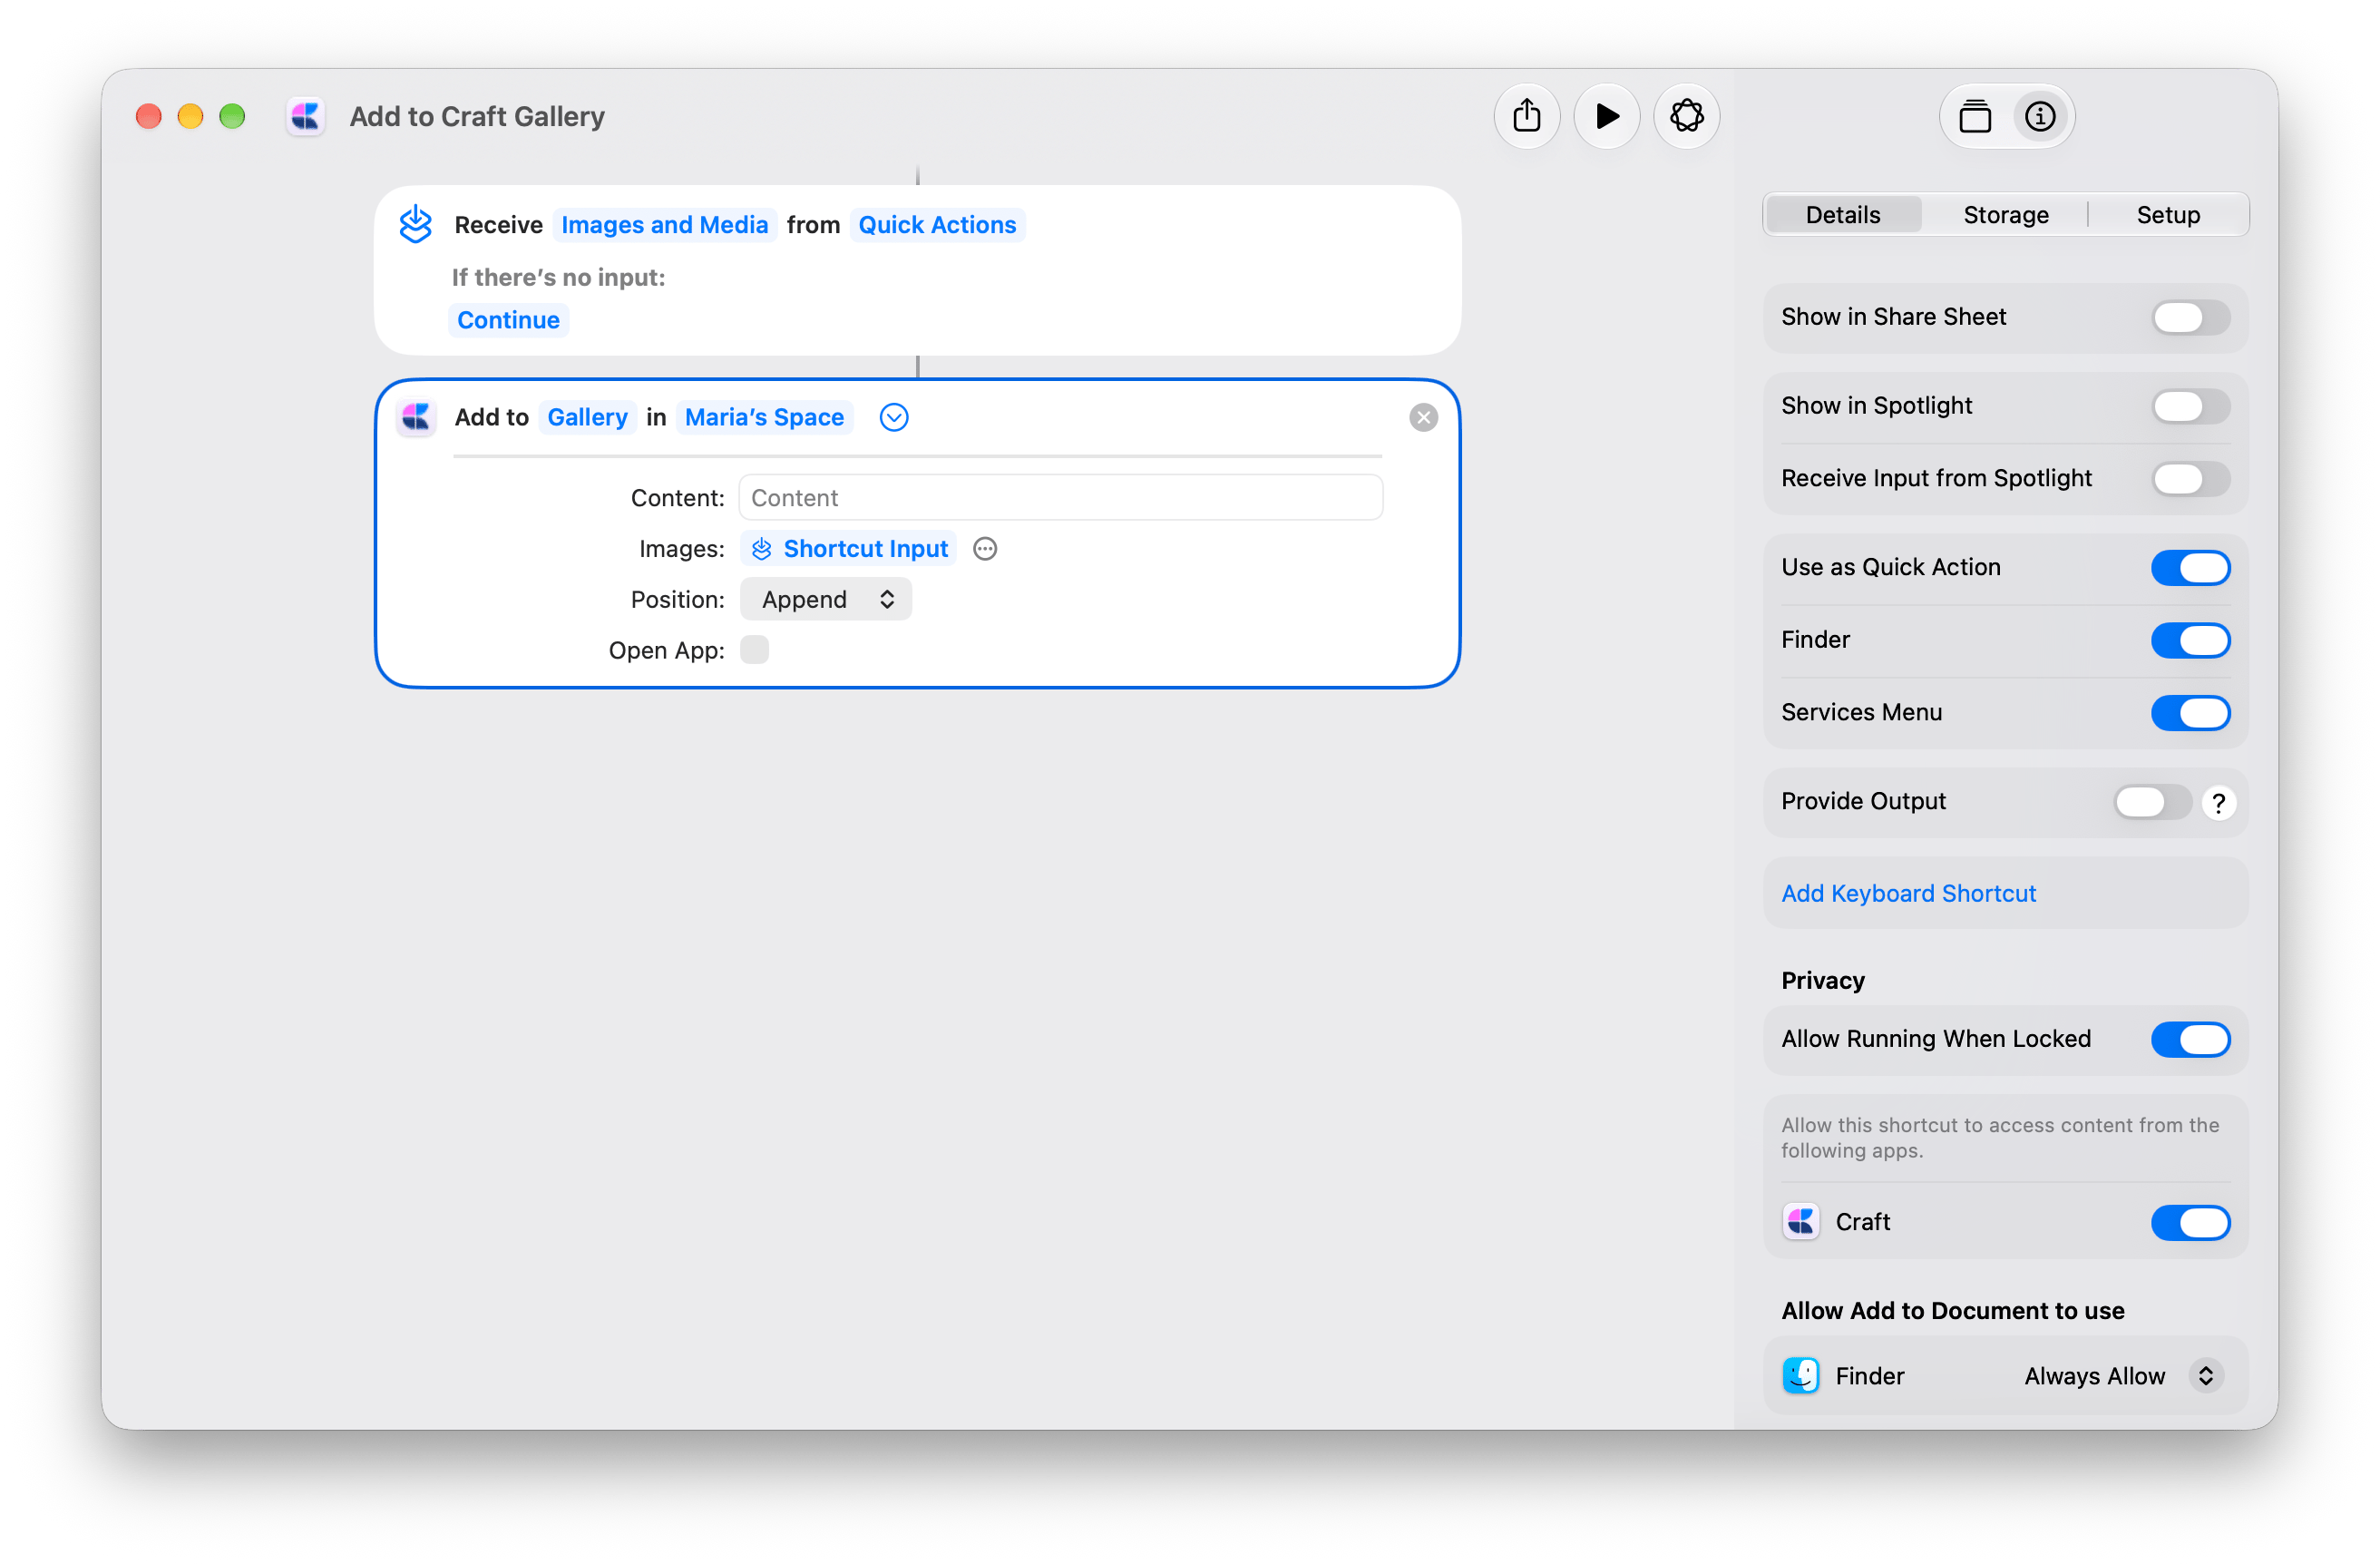
Import a text file with a generated title
Turn a.txt or .md file into a Craft document from Finder. Apple Intelligence generates the title; the file’s text becomes the document content, with Markdown formatting preserved.
Get the on-device version
Generates the title on your device. Start here for shorter text.
Get the Cloud version
Uses Apple’s Cloud model for longer or more complex text. Requires internet and may take longer.
1
Choose your Craft Space
Open the downloaded shortcut. In Create Document, replace the demo Space with your own. In the Cloud version, also choose the same Space in Rename Document.Folder is set to Ask Each Time, so you choose where to save each import.
2
Enable the Finder Quick Action
Open the shortcut’s Info → Details. Enable Use as Quick Action and Finder. Finder is already enabled in the on-device copy; enable it in the Cloud copy.
3
Import a file
In Finder, right-click one
.txt or .md file. Choose Quick Actions, then your import shortcut. Approve any requested permissions and choose a Craft folder.Craft opens the imported document. Review its generated title and rename it if needed.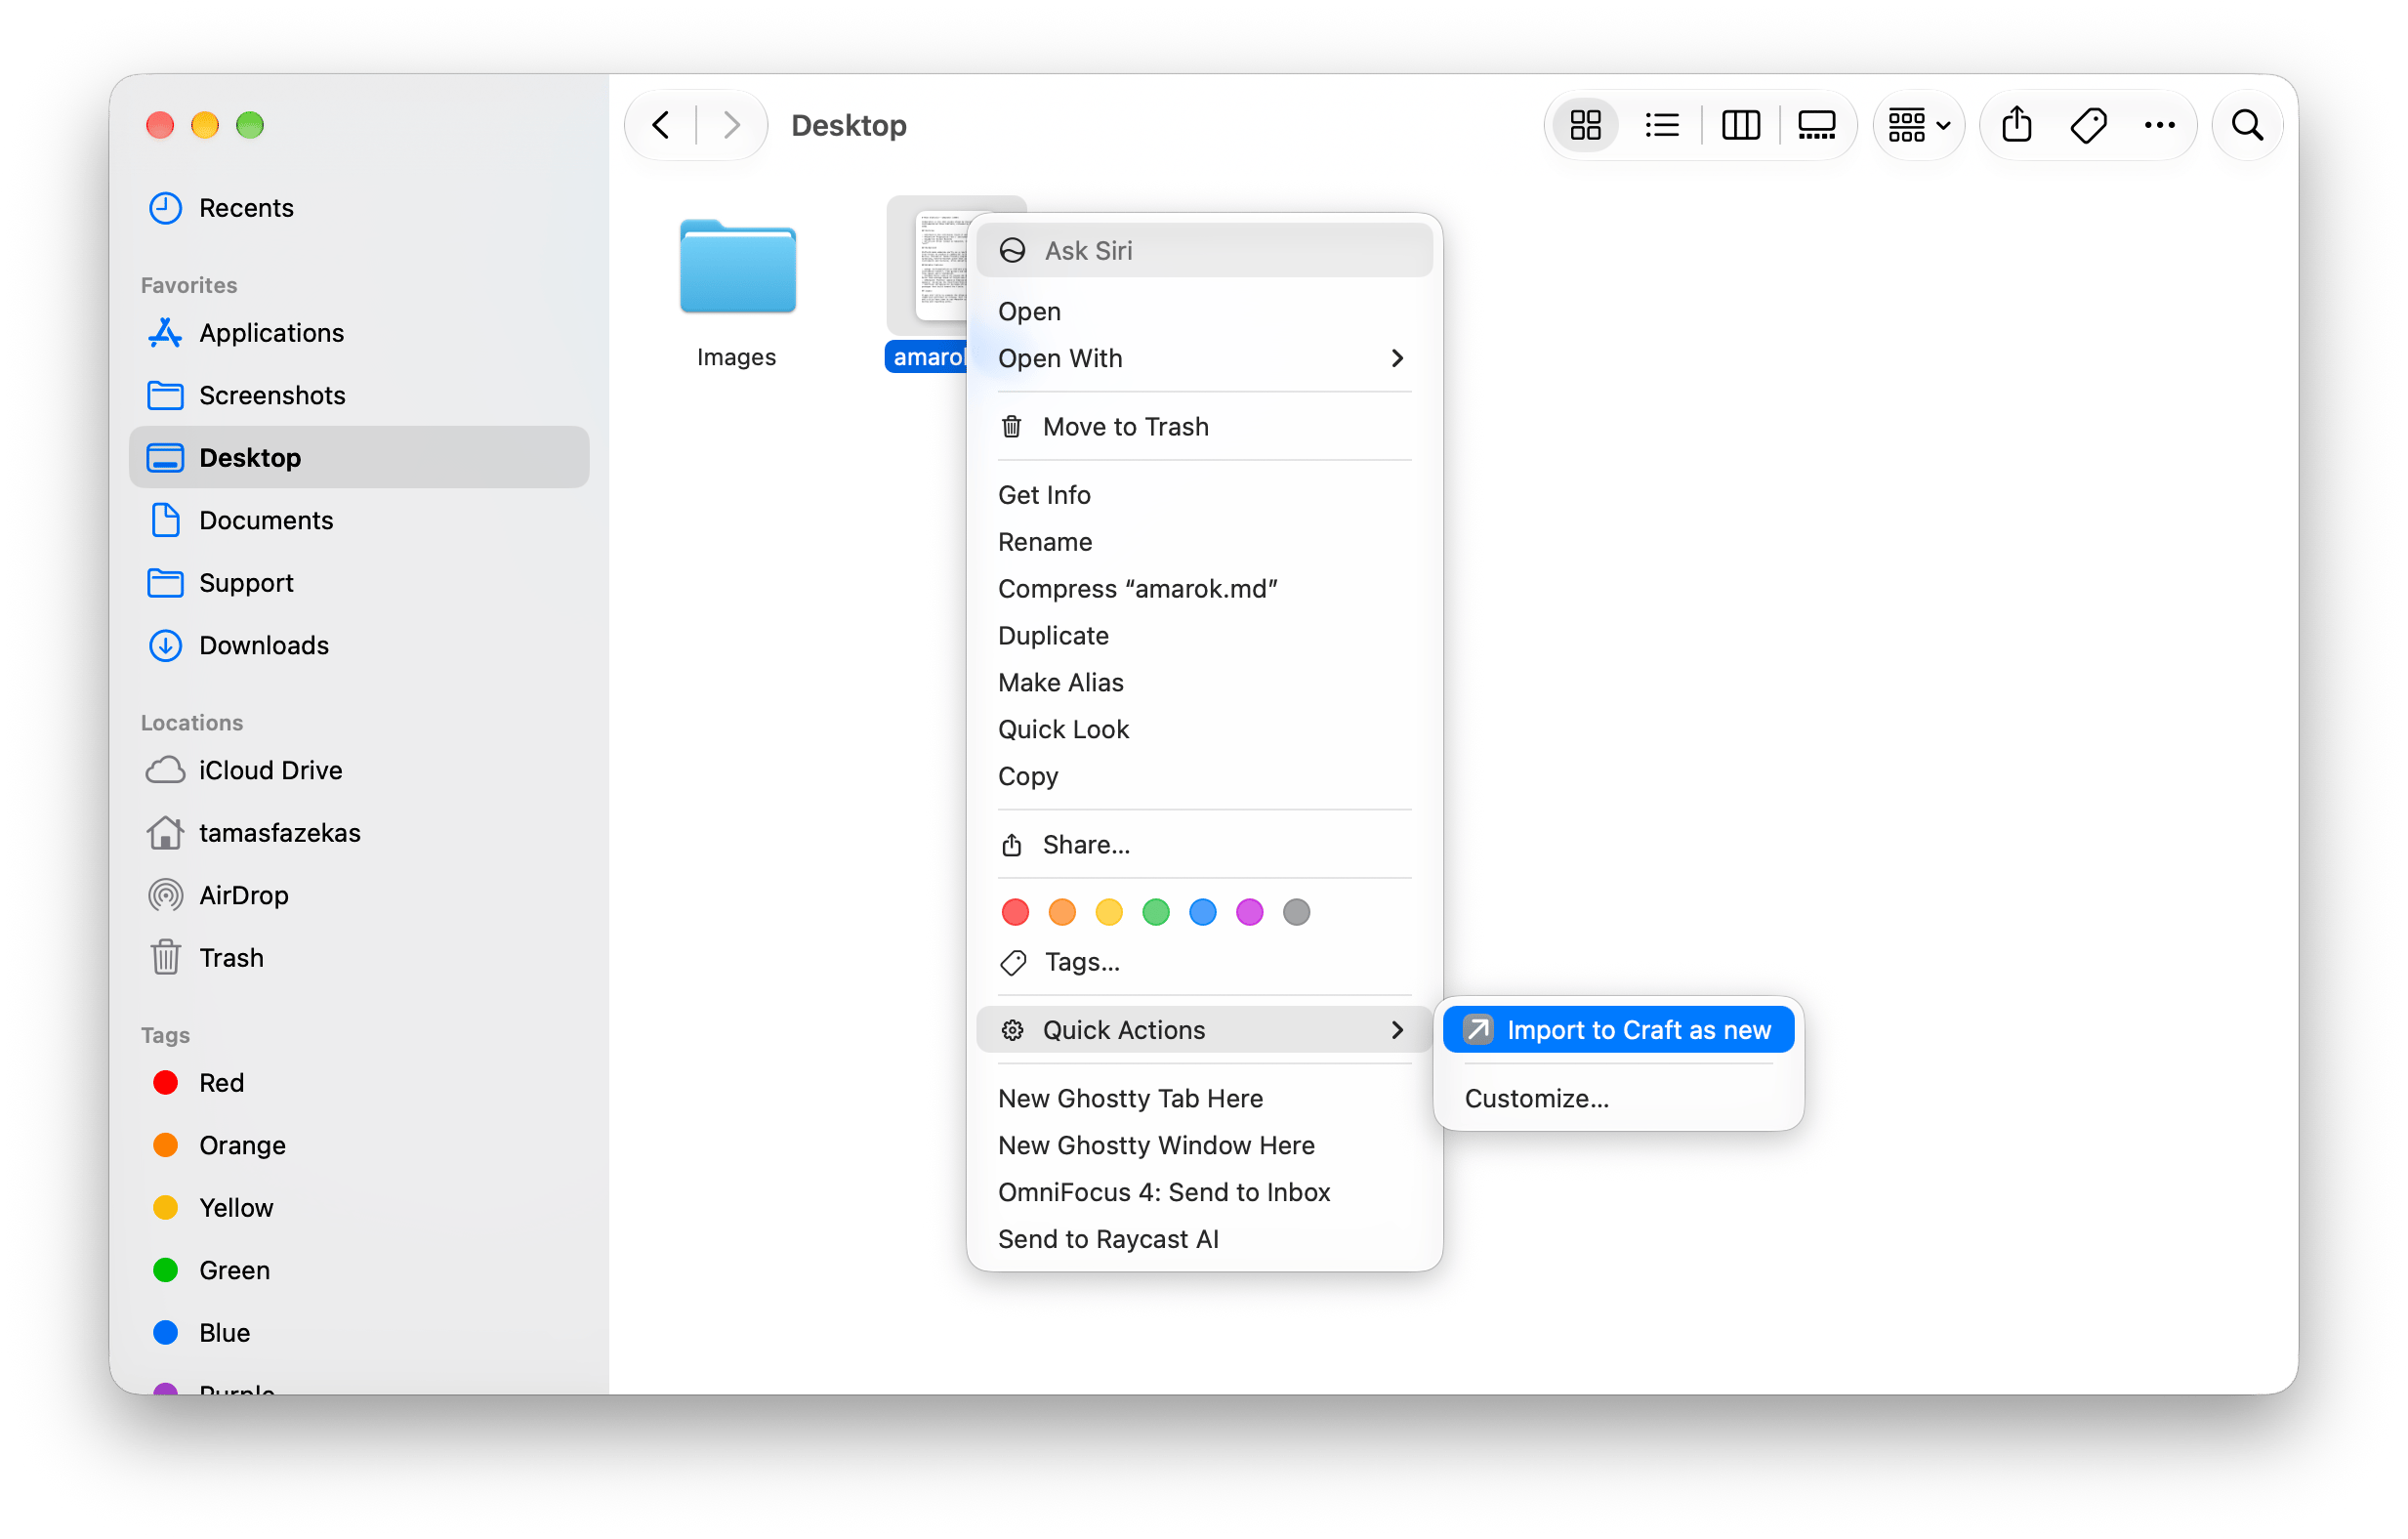
Each run creates a new document. The Cloud version imports the file before generating its title, so the document remains in Craft if the model step fails. The on-device version generates the title first.
How the two versions work
How the two versions work
On-device: Get Text from Input → Use Model → Set Variable → Create Document. The model generates Generated Title, which becomes the new document’s title.Cloud: Get Text from Input → Get Name → Create Document → Use Model → Rename Document. Create Document saves the document with its filename first, then Rename Document replaces the title with the model’s Response. Creating the document only opens it if Open App is on; the default is off.Both prompts request a concise title on one line and use the source’s main heading when suitable. They do not ask the model to rewrite the document content.Craft actions: Create Document and Rename Document.